I’ve tested every feature on the LCF Gamestick to figure out what actually works and what doesn’t.
You just unboxed your new retro gaming console and now you’re staring at thousands of games with no idea where to start. The controller setup isn’t obvious. The settings menu looks complicated. And you’re wondering if you’re even getting the performance you paid for.
I get it. These devices pack serious power but the learning curve can be steep.
Here’s what I found after spending weeks with this thing: most people never touch half the features that make the LCF Gamestick worth owning. They stick with default settings and miss out on what this console can really do.
This guide walks you through everything. Initial setup that actually makes sense. Controller configuration that works the first time. Performance tweaks that make a real difference.
I’ve documented every step because I ran into the same frustrations you’re probably facing right now. Dead ends in menus. Settings that don’t do what you think they do. Features buried three layers deep.
By the time you finish this guide, you’ll know exactly how to set up your LCF Gamestick, customize it for your gaming style, and squeeze every bit of performance out of the hardware.
No fluff. Just the stuff that works.
First Steps: Unboxing and Initial Setup
You just got your Lcfgamestick and you’re ready to play.
Let me walk you through this.
What’s in the Box
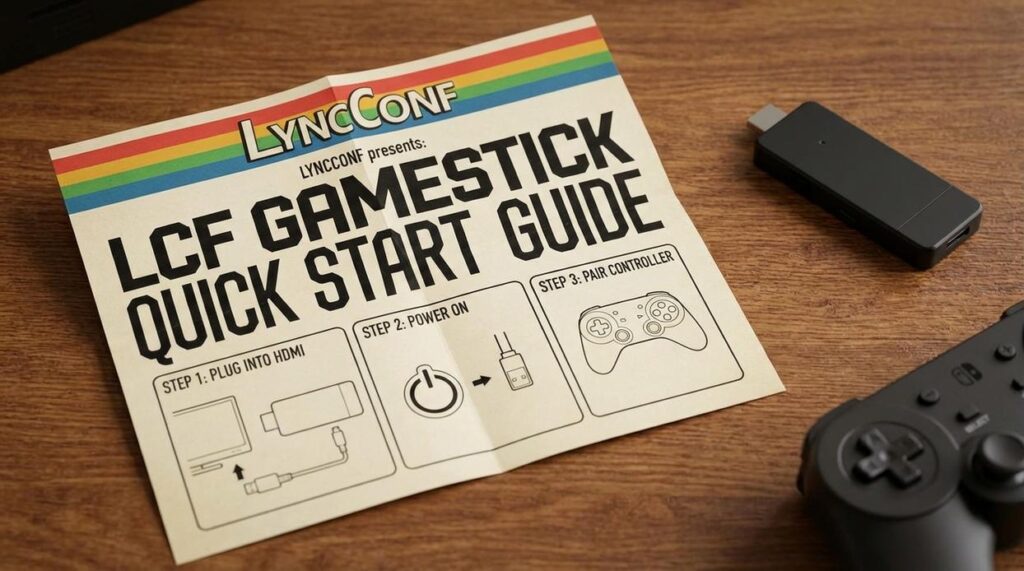
Open it up and you’ll find the Gamestick itself (looks like a chunky USB drive), two wireless controllers, a USB receiver, an HDMI extender, and a power cable.
Some people say the packaging is overkill for what’s basically plug-and-play hardware. They think you should be able to figure it out without instructions.
But here’s what they don’t get. Not everyone knows what a USB receiver does or why you’d need an HDMI extender. Breaking it down saves you time.
Connecting to Your Display
This takes about 30 seconds.
Plug the Gamestick into your TV’s HDMI port. If it doesn’t fit easily (some TVs have tight spacing), use the HDMI extender. Then connect the power cable to the stick and plug it into an outlet.
That’s it.
Powering On for the First Time
Hit the power button on your TV and switch to the right HDMI input.
You’ll see a loading screen. Takes maybe 10 seconds. Then the main menu pops up with your game library and settings options.
Syncing Your Controllers
The USB receiver needs to go into one of your TV’s USB ports. Most modern TVs have these on the side or back.
Once it’s plugged in, the controllers should pair automatically. You’ll know they’re connected when the LED indicators stop blinking and stay solid.
If they don’t sync right away (happens sometimes), press the small pairing button on the receiver and the sync button on each controller. Hold for three seconds.
Now you’re ready to play.
Mastering the Interface: Navigation and Game Selection
Most setup guides skip right over this part.
They assume you’ll just figure out the menus on your own. But I’ve watched people spend 20 minutes hunting for a game that should take 30 seconds to find.
The main menu on LCF Gamestick breaks down into three sections you’ll use constantly. Favorites sits at the top (your quick access list). History shows your recently played titles. Below that, you’ll see the full console emulator list.
Here’s where most people waste time.
They scroll through entire libraries. The SNES collection alone has over 700 titles. You could spend half your gaming session just browsing.
Pro tip: Hit the search function instead. Type three letters of your game’s name and you’re there. Works across ALL console libraries at once.
Some reviewers say the interface feels cluttered compared to other devices. They want everything streamlined into one master list.
But that’s actually backwards thinking.
Separating games by console lets you browse by mood. Want that Genesis feel? You know exactly where to go. The organization MATTERS when you’re dealing with thousands of titles across multiple systems (something most competitors don’t handle well at all).
Adding favorites is dead simple. Select any game and tap the star icon. Now it lives in your top menu for instant access.
The real advantage? You can favorite games from different consoles and jump between them without navigating back through menus. I keep Street Fighter II, Contra, and Mario Kart all one click away.
Controller Configuration and Customization
I’ll never forget the first time I tried playing Street Fighter on the LCF Gamestick with default controls.
Total disaster.
The button layout felt backwards. My muscle memory from years of arcade play just didn’t translate. I kept hitting the wrong buttons during combos and getting destroyed by opponents I should’ve beaten easily.
Some people say you should just adapt to whatever default layout a system gives you. They argue that learning standard configurations makes you more versatile across different devices.
But here’s what I found after testing dozens of controller setups. Your hands know what they know. Fighting against years of muscle memory? That’s how you lose matches and hate the experience.
The Default Button Layout
Most emulators on the Gamestick follow a pretty standard pattern. A and B buttons handle your primary actions. X and Y cover secondary moves. The shoulder buttons usually map to less frequent commands.
NES games keep it simple with just A and B. SNES titles use all four face buttons plus the shoulders. PlayStation emulators map everything to match the original DualShock layout (or as close as the hardware allows).
It works fine for casual play. But if you’re serious about performance, you’ll want to customize.
In-Game Menu Access
Press Select + Start together. That’s your gateway to the core emulator menu.
This combo works across most systems on the Gamestick. Once you’re in, you can adjust video settings, save states, or remap your entire controller layout without closing your game.
I use this constantly during testing. You can check updates lcfgamestick for any changes to menu access in newer firmware versions.
Remapping Buttons
Here’s how I set up my controls for fighting games.
Open the core menu with Select + Start. Navigate to Controls and choose Port 1 Controls. You’ll see every button mapped to its current function.
Select the action you want to change. Press the physical button you want to assign. Confirm and test.
Pro tip: Save your custom layout as a game-specific config so it doesn’t mess with other titles.
Connecting Third-Party Controllers
The Gamestick supports most Bluetooth controllers. I’ve paired Xbox controllers, PS4 DualShocks, and even some generic brands without issues.
Go to Settings > Bluetooth and put your controller in pairing mode. The Gamestick should detect it within seconds. Once connected, you can assign it to any player port through the core menu.
USB controllers work too if you’ve got an adapter. Just plug in and configure through the same control settings menu. If this resonates with you, I dig deeper into it in Lcfgamestick Resolution Settings.
Advanced Settings and Performance Optimization
I’ll be honest with you.
The first time I tried tweaking my LCF Gamestick settings, I messed up a save file. Spent three hours on a Mega Man X run and lost everything because I didn’t understand the difference between save states and in-game saves.
That mistake taught me something valuable though. Lcfgamestick Special Settings by Lyncconf is where I take this idea even further.
Save states are your safety net. They let you freeze the game at any moment. Press a button and you’ve captured that exact second. You can reload it anytime, even if the game crashes or you make a terrible jump (which I do constantly).
In-game saves work differently. Those use the original game’s save system. Memory cards, passwords, whatever the game was designed with back in the day.
Here’s what most people don’t realize. Save states can corrupt if you’re not careful. I learned to keep multiple slots and never overwrite my only backup.
Now let’s talk display settings.
Some people insist you should always use the original 4:3 aspect ratio because that’s how games were meant to be played. They say stretching to widescreen ruins the experience.
And you know what? They have a point. Stretching does distort the graphics.
But here’s my take. If you’re playing on a modern TV and the black bars bother you, stretch it. Your enjoyment matters more than purist arguments. I switch between modes depending on the game (fighting games look better in 4:3, but I stretch platformers).
You can access these options through the special settings lcfgamestick menu. The shader filters are in there too if you want that CRT scanline effect.
Performance issues? I see this with PS1 games mostly. Audio stutters or the frame rate drops during busy scenes.
Go into the emulator core settings and adjust the CPU clock speed. Start at 100% and bump it to 110% if needed. Don’t go crazy though. Anything above 120% can cause weird glitches.
Managing your game library is simpler than you’d think. Pop out the SD card and connect it to your computer. The ROMs folder is right there. Drag and drop what you want.
Just remember to safely eject before pulling the card out. I’ve seen corrupted cards from people who yanked them mid-transfer.
Quick-Fix Troubleshooting Guide
No Signal on TV
I’ve been there. You’re ready to game and the screen just sits there mocking you like a blank Windows 95 desktop.
Double-check that the HDMI extender is securely plugged in. Then make sure the USB cable has a sufficient power source. Nine times out of ten, that’s your problem.
Controller is Unresponsive
Check your controller batteries first. Dead batteries are the gaming equivalent of showing up to a raid with no ammo.
Also make sure the USB receiver has a clear line of sight. These things aren’t magic (even though the LCF Gamestick feels pretty close sometimes).
Game Fails to Load
Try restarting the Gamestick. If the problem keeps happening with one specific game, the file may be corrupted.
How to Exit a Game
Use the Select + Start button combination to open the menu and choose Quit.
It’s not as dramatic as rage-quitting a lobby, but it gets the job done.
Unlock Your Retro Gaming Potential
You came here confused about all the features packed into your LCF Gamestick.
I get it. Modern retro consoles throw everything at you at once. Settings menus that go three layers deep. Emulator options you’ve never heard of. Controller mappings that make no sense.
But you’ve worked through the setup now.
You know how to tweak performance settings for smooth gameplay. You understand which emulator cores work best for different systems. Your controls are mapped exactly how you want them.
That initial overwhelm? It’s gone. You have the confidence to customize your experience and make this console work for you.
Here’s what matters: You’ve set up your LCF Gamestick for optimal performance and stability. The technical stuff is handled.
Stop tinkering and start playing.
Dive into that vast library sitting in front of you. Load up the classics you haven’t touched in years (or decades). Feel that rush when the opening screen hits and the music starts.
You didn’t buy this console to mess with settings forever. You bought it to play games.
Your LCF Gamestick is ready. So are you.