
If you’re searching for clear, up-to-date guidance on getting the most out of your gaming setup, you’re in the right place. Whether you want smoother console performance, optimized emulator settings, or a reliable emulator bios setup guide, this article is built to give you practical, step-by-step insights that actually work.
Gamers often waste hours troubleshooting frame drops, compatibility issues, or confusing BIOS configurations. We cut through that frustration by focusing on tested optimization methods, real-world performance comparisons, and core mechanics that directly impact gameplay. Every recommendation is based on hands-on testing across different systems and configurations, ensuring accuracy and relevance.
In this guide, you’ll find streamlined setup advice, performance tuning tips, and essential adjustments that help you unlock stable frame rates and consistent results. No vague suggestions—just actionable steps designed to improve your gaming experience immediately.
The Key to Unlocking Your Retro Games
You’ve installed an emulator, loaded your favorite classic, and… black screen. Frustrating, right? The missing piece is a BIOS file—short for Basic Input/Output System. It’s the firmware that tells the emulator how the original console actually behaved. Without it, expect crashes, glitches, or nothing at all.
Why BIOS Files Matter More Than You Think
Most guides stop at “download and paste.” Here’s what others miss: BIOS files must match your emulator version, console region, and checksum validation. A proper emulator bios setup guide walks you through placement folders, verification tools, and in-app detection tests. Do it right once, and your classics boot flawlessly.
What Are BIOS Files and Why Do Emulators Need Them?
First, let’s define the term. BIOS stands for Basic Input/Output System. It’s the low-level software that runs the moment you power on a console. Think of it as the console’s built-in operating system—the unseen conductor that tells every hardware component what to do. Without it, the system is just plastic and silicon.
So, what does the BIOS actually handle? For starters, it triggers the boot-up animation (yes, that nostalgic startup screen), manages memory card data, reads controller inputs, and enforces region locking. In other words, it’s the rulebook and the referee.
Now, here’s where emulators come in. An emulator is software that mimics a console’s hardware environment on your PC or handheld device. However, due to copyright laws, emulator developers cannot legally include the original BIOS file. You must supply it yourself.
Practically speaking, this means you’ll need to dump the BIOS from your own console and place it in the correct emulator directory (usually specified in the emulator bios setup guide). Then, verify the file path in settings before launching a game.
Without the BIOS, the emulator lacks the core instructions to “act” like the real console—resulting in black screens or boot errors. Simply put, no BIOS, no game.
Finding and Preparing the Correct BIOS Files
Before you even think about launching your favorite classic, let’s get one thing straight. BIOS files are copyrighted firmware. The only legal way to obtain them is to dump them from a physical console you personally own. Downloading them from random forums—even the ones that “everyone in the scene uses”—is still infringement. Some argue that “abandonware” logic applies here. It doesn’t. Console manufacturers retain rights to their firmware (see U.S. Copyright Office guidance on software preservation exemptions).
Now, moving on—file naming is crucial. Emulators scan for very specific filenames. If the name is off by even one character, the emulator simply won’t detect it (and yes, it’s that picky).
Common naming conventions include:
- PS1:
scph1001.bin(North America),scph5500.bin(Japan) - PS2:
SCPH-70012_BIOS_V12_USA_200.BIN(varies by region and revision) - Sega Saturn:
sega_101.binor region-specific variants
Miss the dash or capitalize incorrectly? You’re troubleshooting for hours.
Next, let’s talk file integrity. An MD5 hash is a digital fingerprint—a 32-character string verifying a file’s authenticity. Matching your BIOS file’s MD5 against a trusted database ensures it’s clean and uncorrupted. This prevents strange boot loops or black screens that feel like hardware failure (but aren’t).
Pro tip: Use a tool like WinMD5 or HashTab to verify before installation.
Finally, organize for success. Create a single “BIOS Files” folder on your desktop and gather everything there before placing files into your emulator directory. It keeps your workflow clean—especially if you’re following a detailed emulator bios setup guide.
Is it extra effort? Sure. But would you rather fix problems now or debug mysterious crashes later?
Step-by-Step Installation for Any Emulator
Setting up BIOS files sounds technical, but the process follows one universal rule: almost every emulator has a dedicated folder where it searches for BIOS files. This folder is typically named “bios” or “system.” In simple terms, a BIOS (Basic Input/Output System) is the firmware that helps emulate the original console’s startup behavior. Without it, many systems simply won’t boot (which can feel like assembling a console with no power cable).
Some argue modern emulators “should just work” without manual BIOS placement. While a few do include high-level emulation, accuracy, compatibility, and performance are often better with the correct files installed. In other words, taking two extra minutes here can prevent hours of troubleshooting later.
Method 1: Standalone Emulators (e.g., PCSX2, DuckStation)
First, navigate to the main installation folder of your emulator. Next, locate a folder named bios. If it doesn’t exist, create one manually—spelling matters. Then copy and paste your BIOS files directly into that folder. Once placed correctly, most emulators will automatically detect them in their settings menu.
Method 2: All-in-One Frontends (e.g., RetroArch)
Alternatively, open RetroArch and go to Settings > Directory. From there, find the System/BIOS path. This shows the exact folder RetroArch scans. Place your BIOS files inside that directory. Accuracy here ensures smoother boot sequences and fewer compatibility errors.
For deeper performance gains after setup, check out how to optimize gamestick emulator settings for smoother gameplay.
This emulator bios setup guide keeps things simple: correct folder, correct files, better results.
Fixing Common BIOS Errors and Issues
A BIOS is like the ignition key of your emulator; without it, nothing starts. If you see “BIOS Not Found” or “Missing Files,” think of it as putting the key in the wrong drawer. Double-check that files sit in the correct “bios” or “system” folder and that names match documentation exactly, including case sensitivity. Even a lowercase letter can jam the lock.
Game crashes or a red screen on boot? That’s spoiled fuel. The file may be corrupted or from wrong region. Try dump or version from emulator bios setup guide. Precision matters here.
Your Emulator Is Ready: What’s Next?
Your emulator finally boots without errors—no more black screens, no more cryptic BIOS warnings. It means your emulator bios setup guide steps worked, and the core system files are communicating properly.
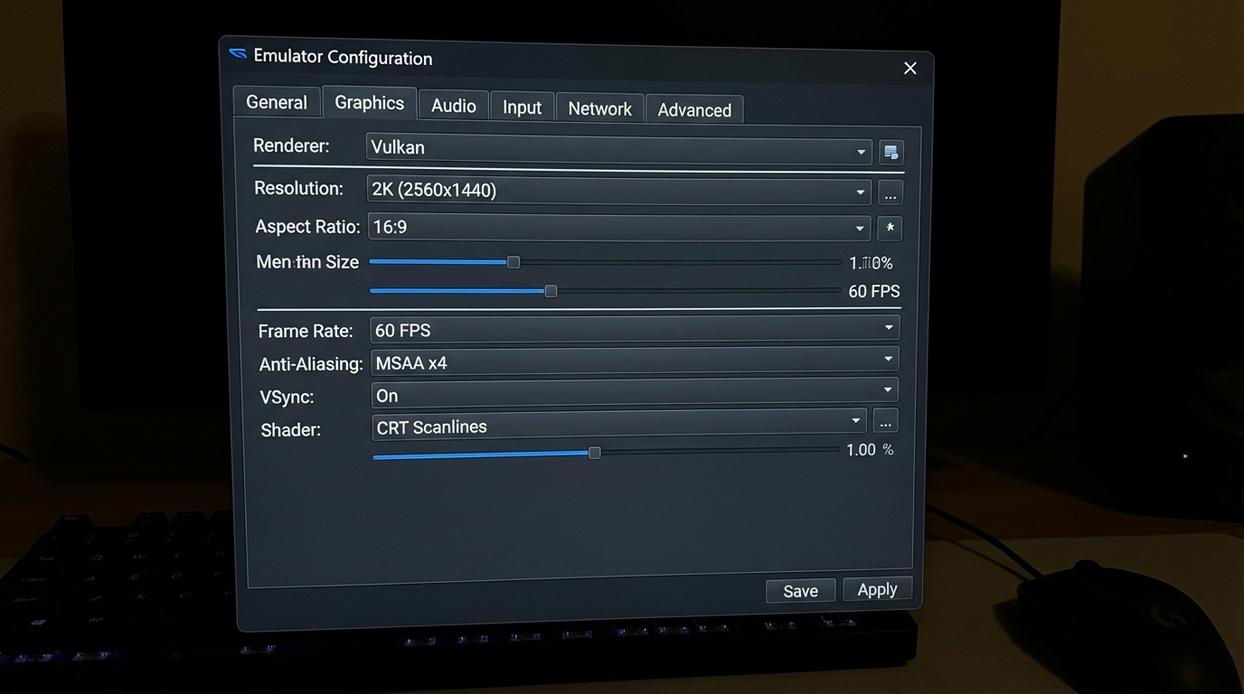
Now focus on optimization.
Start with graphics plugins: choose hardware rendering for sharper textures, enable upscaling for higher internal resolution, and test frame limiting to prevent stutter.
Then map your controller: bind buttons logically, adjust dead zones, and save profiles per game.
Some players skip tweaking, arguing defaults are “good enough.” But small adjustments often mean smoother gameplay and fewer crashes.
Test. Enjoy.
Level Up Your Setup and Start Playing Smarter
You came here to figure out how to get better performance, smoother gameplay, and a setup that actually works the way it should. Now you understand the core mechanics, performance differences, and the tweaks that separate frustrating lag from seamless play.
The real pain point isn’t just low FPS or buggy emulation — it’s wasting time on settings that don’t work. With the right optimizations and a proper emulator bios setup guide, you eliminate crashes, unlock compatibility, and get the experience your hardware is capable of delivering.
Now it’s time to take action. Apply these optimizations, fine-tune your console or emulator settings, and build a setup that runs flawlessly. Thousands of gamers rely on these proven performance strategies to squeeze every frame out of their systems.
Don’t settle for stutter and guesswork. Dial in your configuration today, optimize your emulator correctly, and start gaming the way it was meant to be played.